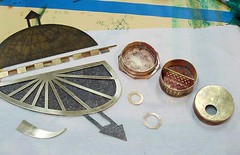
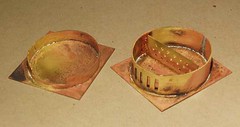
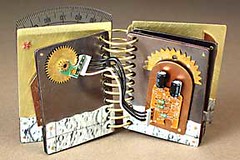
Here are the brass parts for the Dream Focusing Device. They need to be really clean so I can put the resist on for etching. Today I sanded them thoroughly. I also made a new top for the receiver. It's the one in the center back. I form the side wall, which is basically a wide bracelet, then I solder that seam. Then I place it on a base which is larger than the oval, and solder the side wall to the base. There are more precise ways to make boxes, but I'm not patient enough. This seems (pun!) to work fine. I need to trim the extra parts of the base away now, and file the edges round. The old top, which is at the lower right, has a small gap in the back seam. It was bothering me, so I figured I had to try to make a better one.
I haven't been in the studio much. Mostly 40 minutes here and there. But it does add up. I can "see" this thing finished now, and am enjoying working on it. We will have a week off later this month, so I'm hoping for some significant progress.
Sunday, December 17, 2006
Saturday, December 02, 2006
The Antikythera Mechanism
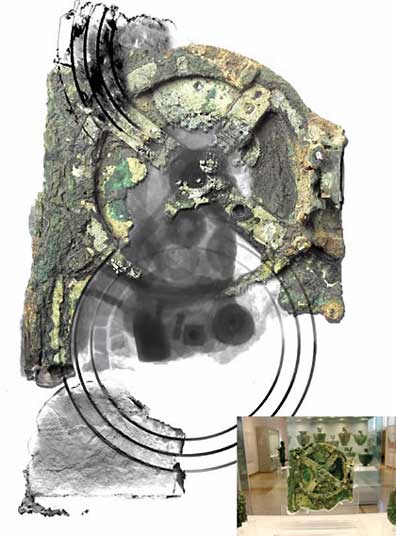
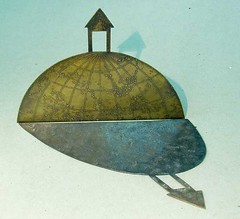
This is a bronze device found on a sunken ship near Antikythera, in Greece, that is almost 2000 years old. The image above comes from an article in Nature. This device was able to calculate a number of astronomical events. It's not clear exactly what functions it was built to perform, but it's a very complicated instrument with at least 30 gears. Check out this wikipedia article.
Why am I interested in this? Well, I am fascinated by archeology and ancient brass instruments. This seems to be the earliest known instrument of it's kind. I don't have the patience to sit and read the details on the computer screen, but the images are enchanting and inspiring. It is amazing that people 2000 years ago could build something this complex. I wonder what tools they used to shape it? And it seems to have been fairly accurate. This is not the kind of thing covered in art history classes. I always feel delighted when I find something like this.
Friday, December 01, 2006
Crimp this! Crimp that!
We had our heat worked on several weeks ago. One of the guys left an interesting tool one day. I immediately took it into my studio to see what it would do. (I did give it back the next day!) It was a crimper, used for making heating ducts a little smaller, so they fit together well. Erwin's crimper was a three blade version, with a very nice handle. He says they don't make them any more. Too Bad.
I did find an assortment of them on the internet, and ordered one made by Malco. It has five blades, they do also make three bladed crimpers. It feels very solid and has a nice handle. Today I was waiting for the inspector to check off the work, so I played with some copper. I used 24 gauge annealed copper for most of the tests. For one test I used tooling copper, which is around 30 gauge, and very soft. I sanded the copper pieces with 400 grit wet or dry sandpaper first. Then they were dipped in liver of sulfur, polished with a very soft brass brush. I repeat this until I like the color. Then I crimped in different patterns.
I like the look better than the metal crimpers that look like pasta rollers. (I have no idea what they're called.) This irregular texture is more appealing to me. However, it's a fairly large scale texture and might not work for jewelry. The crimps are about 1-7/8 inches long and 1/8th of an inch deep. It isn't a sharp fold in the metal. Below are the results. If you want to see these enlarged, check out my flickr photo set, Testing.

Sample one. This is the pattern I get crimping along one edge. This piece of copper is 24 gauge, about 4 inches wide.

Sample two. I was trying for rays here. I think the three blade crimper would be better. This is 24 gauge copper, about 2.5 inches wide.

Sample three. This is a piece of tooling copper, about 30 gauge. I scribbled on the back with a ball point pen, then colored the metal with liver of sulfur, crimped from both sides, and colored the metal again. 4 inches wide.

Sample four. I crimped from all angles, sometimes crimping over other crimps. 24 gauge copper, 2.5 inches wide.

This was sample four, hammered almost flat. This one starts to get interesting to me. A little more crimping and hammering might make it very nice.

Here is the back of sample four, I think it could be interesting with a little more sanding and coloring.

And this is sample two, hammered almost flat.
I did find an assortment of them on the internet, and ordered one made by Malco. It has five blades, they do also make three bladed crimpers. It feels very solid and has a nice handle. Today I was waiting for the inspector to check off the work, so I played with some copper. I used 24 gauge annealed copper for most of the tests. For one test I used tooling copper, which is around 30 gauge, and very soft. I sanded the copper pieces with 400 grit wet or dry sandpaper first. Then they were dipped in liver of sulfur, polished with a very soft brass brush. I repeat this until I like the color. Then I crimped in different patterns.
I like the look better than the metal crimpers that look like pasta rollers. (I have no idea what they're called.) This irregular texture is more appealing to me. However, it's a fairly large scale texture and might not work for jewelry. The crimps are about 1-7/8 inches long and 1/8th of an inch deep. It isn't a sharp fold in the metal. Below are the results. If you want to see these enlarged, check out my flickr photo set, Testing.
Sample one. This is the pattern I get crimping along one edge. This piece of copper is 24 gauge, about 4 inches wide.
Sample two. I was trying for rays here. I think the three blade crimper would be better. This is 24 gauge copper, about 2.5 inches wide.
Sample three. This is a piece of tooling copper, about 30 gauge. I scribbled on the back with a ball point pen, then colored the metal with liver of sulfur, crimped from both sides, and colored the metal again. 4 inches wide.
Sample four. I crimped from all angles, sometimes crimping over other crimps. 24 gauge copper, 2.5 inches wide.
This was sample four, hammered almost flat. This one starts to get interesting to me. A little more crimping and hammering might make it very nice.
Here is the back of sample four, I think it could be interesting with a little more sanding and coloring.
And this is sample two, hammered almost flat.
Sunday, November 19, 2006
Myself as my Grandfather, made of crickets, grass and rain.
I didn't get any work at all done in the studio this week. We had a lot of work done on the house. I can't focus when there is pounding or when people are walking back and forth. Next week, which is Thanksgiving in the U. S., will probably be the same. Hopefully the following weekend will be very productive.
I did manage to add some things to my web site:
Seeing Fish
Fish Who Swims in the Sky
Myself as my Grandfather, made of crickets, grass and rain.
Spectacles for a Fish Goddess
Lorgnette for a Fish Goddess
When I see the stars
I also added detail shots to Fish Messages. Scroll down to see the details.
They are all "old" things. But still some of my favorites. I also reorganized my web site. Hopefully it will be a little easier to use. All the page images for each book are on one page now, instead of having to click forward to another page to see another pair of pages.
Monday, November 13, 2006
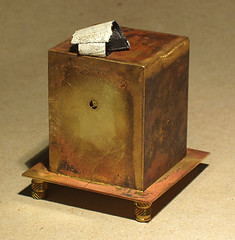
I receive you loud and clear!
Here is the next stage of the receiver transmitter for the dreaming focusing device. The cover is on the left, the body is on the right. You can see the vertical openings where the focused dream comes in. And the little holes in the center divider will allow the selected dream type into the transmitter side.
I have to clean these pieces up and dip them in hot beeswax. Next I will draw designs on the parts and etch them in ferric chloride. I am waiting for a clear day to do that. In the meantime I need to make the dial for the top, which will allow the user to chose the type of dream. I am thinking the selection should be: fish, bird, bear, star and moon. I would like to have any and all of those dreams.
What you can't see here is that I am having to learn to solder (high temperature brazing, using an acetylene torch), on a different scale. This 2.5 inch long box is much harder to solder than the little things I'm used to. In fact last week I described it as "4 inches long." It feels huge to me. I spent ages with the torch trying to get the body hot enough. Finally, when it was done, the seam looked pretty good. I thought the cover would be much easier. Unfortunately it took me three tries to get the whole cover seam soldered. But I am learning. I got the center divider right on the first try.
Saturday, November 04, 2006
Imaresco South Mar
I am in a large room. Lots of people. We are drawing. Then we pick up our stuff. We're going to meditate. There are holes in the tables for our faces. People move all around.
I see Joan. She asks if my name is on the back of her sweatshirt. It isn't. She says it should be. I put it on with press-on letters. She will remove them later. She tells me they didn't accept my books because they were the same ones as last year. I tell her I wish I had more new work, and that I want to be in the studio more.
When I go back to my table it has been moved. Everyone is getting mats with holes for their faces. I can't find one. Finally I find a stack of mats. I grab one. It is suede, a nice tan color, and very soft.
I wander into a big room on the lowest level looking for a spot. People are aligning their mats to North and beginning to lie down. I line my mat up with other people's because I don't know where North is. I lie face down first, but someone makes a noise. I look around. Everyone is on their backs, with their arms out. I turn over. I realize I am in the room with the advanced people. Some guy squeezes onto the end of my mat. When I look he has a skinny little kid tucked under his arm. There is a guy leading the chant. It starts "Imaresco South Mar." Everyone chants back.
I wake, worrying that I don't know the chant. But I also know that people will be kind, they like beginners.
Friday, November 03, 2006
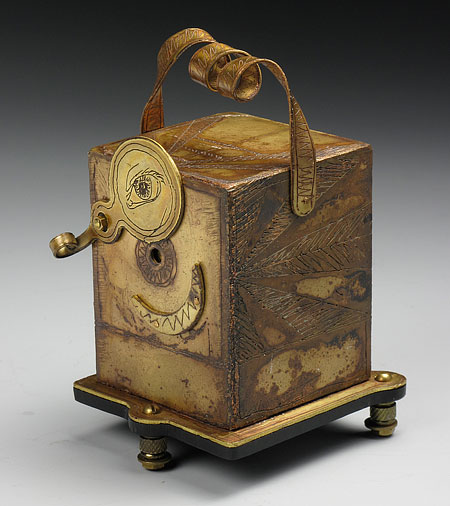
Now where did I put that?
This is an old project I am resurrecting. It's a dream focusing device. (click on the image to see a larger version and a little more information.) It has been lying around unfinished since 1997. I found about 20 sketches for it, and the associated parts, in three different sketch books. Not that I am organized about these things. I usually have several "active" sketchbooks at any given time. I am missing an important part. I stayed up late one night to draw the path of the moon on a piece of paper so I could make the shadow accurately. Now that paper is gone. But I think I can proceed without it.
I'm not sure about the actual title yet. Hopefully it will come to me. I think I have figured out how to focus the dreams, but I'm not clear yet on how to get them transmitted to the sleeper's brain. The in-progress receiver/transmitter is here.
It has been a crazy week, but I am getting a few hours in the studio here and there. Not much time for anything. I am realizing that either things will be chaotic or I will get some art done. Tough choice, because I feel stressed. Maybe that will pass.
Monday, October 23, 2006
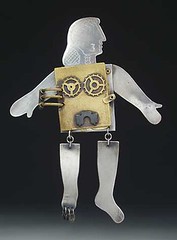
Wayne Martin Belger's Amazing Pinhole Cameras

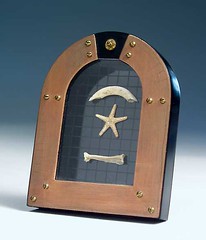
Deer Camera, Wayne Martin Belger, Steel, brass, bone and antlers, 24 x 5.
Varnish Gallery has a show of the most incredible pinhole cameras made by Wayne Martin Belger. They are also showing the photos taken with the cameras. There is an article about the show in the San Francisco Chronicle. And check out his web page, Boy of Blue. You can see more cameras, and 360 degree views.
Tuesday, October 17, 2006
The Book Arts Jam 2006
The Book Arts Jam was wonderful. There were so many things to see, and I didn't see most of it. Every year I think, "next year I won't apply for a table, I'll just attend, volunteer a few hours and enjoy everything." But talking to people about art, and my work in particular, is very energizing and helpful for me. There are photos on flickr. I didn't have much time to look around, so it's a very limited assortment. Tons of stuff happened that I didn't see. I think photos will be posted on the Jam web site.
I have to say, it went well for me. I sold two books, which is great. And I did get a lot of positive feedback. Although I saw a lot of nice people, including people I haven't seen for years, there wasn't really enough time to talk on a personal level. And by early afternoon, my brain had stopped functioning, so I think I have forgotten some conversations already. I'm just not good in these large, loud settings. People were streaming through. But I loved it!

I have to say, it went well for me. I sold two books, which is great. And I did get a lot of positive feedback. Although I saw a lot of nice people, including people I haven't seen for years, there wasn't really enough time to talk on a personal level. And by early afternoon, my brain had stopped functioning, so I think I have forgotten some conversations already. I'm just not good in these large, loud settings. People were streaming through. But I loved it!
Friday, October 13, 2006
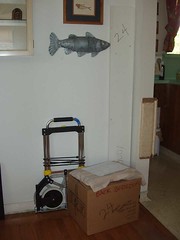
Packed and ready to go
Today I am ready for the Book Arts Jam and plan to do laundry and relax a little. Sunday I will be tired, but I want to start my next pinhole camera. And Monday it's back to the real world.
I got two fantastic book arts links yesterday from judyofthewoods. Check out her wonderful handmade house. The first link is Magic Fly Paula's Star Diary set. This is a beautiful collection of star (as in the sky) imagery.
And Ninth Wave Design's Moleskine Pocket Sketchbook. He is doing alchemy designs. Fantastic! Ninth Wave also sells Moleskine notebooks on the web site. Some are on special right now. I didn't know there were so many choices. Now I think I need a bundle of these.
There are comments on my blog entries that aren't showing up. In the past it has taken days, or they show up when I do the next post. Even that isn't working right now. Either I don't know how to use blogger, or it stinks. Both are possibilities. I wish someone would come to my house and fix all this for me.
Thursday, October 12, 2006
Memocam Information
Now Craft has a link to my tutorials page! Unfortunately there is a small mistake. I don't have a tutorial on making metal cameras on my tutorials page. There is a tutorial to make a matchbox pinhole camera. And I do have the metal book tutorial they mention.
Below is a quickly written description of making the Memocam. You can see the first stage here. I use very basic metalworking and jewelry skills. The sides were cut with a metal shear. If you are patient you could cut them with a jeweler's saw. There is some filing to clean up edges, then the box is soldered (actually braised) together. I use an acetylene torch and silver solder.
To make the base I cut the flange pieces to just fit inside the box. I can't do precise measuring, and approximating usually works fine. The design on the camera is etched with Ferric Chloride. Warning: very caustic acid. The coloring is a heat treatment.
The base has a piece of black plexiglass under the brass base. I cut it with a jeweler's saw. The little legs are beads and washers, held in place with nuts and bolts. The shutter is also attached with a nut and bolt. It's light tight in that area because I put the pinhole inside with a piece of gaffer's tape, which also covers the nut and bolt. The handle and the crescent shaped stop for the shutter are attached with rivets made from earposts. There are instructions on my tutorials page for these rivets.
15 minutes for the Memocam
I assume most of you are artists. And you probably all have moments of feeling like you're working in obscurity, with no notice, and no appreciation from other people (aside from your mother, of course). I feel that frequently. Well, today, I feel noticed. First, a week ago, Marc Snyder of Fiji Island Mermaid Press commented on the early stage of my brass camera. (Marc has a blog and web site. I love his Artist's book of the month club.) Then I got an email from Tinkergirl, saying she had linked to my blog. She is into the "lighter side of steampunk" at Brass Goggles. And here's my Memocam on Make magazine's web site! I am so pleased. Is it too uncool to say I'm delighted? I have had a ton of views on my "brass pinhole cameras" flickr set. And some very nice emails from a bunch of people. Including some fascinating links to check out. Is this my 15 minutes of fame? I am loving it.
Tuesday, October 10, 2006
Memocam
It's done, just in the nick of time. I'll take this little gem to the Book Arts Jam with me this coming Saturday. There are some small problems, but I have ideas for the next one. And I can't wait to start.
On the base the instructions read: 1. Fix memory in your mind. 2. Point Memocam toward memory. 3. Expose film. Click on the image to see more info on my flickr page.
Saturday, October 07, 2006
3 . . . 2 . . . 1 . . . JAM!
The countdown has started. The book arts jam is only 7 days away. I have a list of things to do, including making a list. Today I finished the handout for the pinhole camera demo. What does that have to do with book arts, you might ask? Well, several people expressed an interest. Hopefully there will be more than two people at the demo. I'll try to get a few photos. Of course, photos are very useful for collage, and the pinhole cameras make great photos.
So the handout is on my website as a pdf, and on my flickr pages as a photo essay.
Later today I hope to work on my brass pinhole camera. I plan to bring it along to the Jam for good luck.
So the handout is on my website as a pdf, and on my flickr pages as a photo essay.
Later today I hope to work on my brass pinhole camera. I plan to bring it along to the Jam for good luck.
Friday, September 29, 2006
Brass pinhole camera
I am so excited about this project. I plan to make some tools and objects. What better tool than a pinhole camera? And I could use the resulting photos in collages.
This is my first test, to see how bad the light leaks are, whether the idea works at all.
Next I will add some feet, a shutter and maybe a viewfinder. I already have an idea for the next one. Click on the photo to see my flickr photostream. There are two photos taken with this camera, and a view of the camera open. There is also more information about the exposure times, etc.
Gotta go! I want to work on the base tonight.
Sunday, September 24, 2006
I knew that!
". . . And truthfully, what could be more important for any of us - art makers or otherwise - than to make work that matters to us, work so important that we give up other things in our lives to do it?"
This sentence is on page one of "The View From the Studio Door" by Ted Orland. Didn't I know that? Why do I have to re-learn these things? What a timely reminder. I have been trying to work on the rock book, but there is no joy for me in this series of books, with the exception of the original dinosaur.

This is the seventh event, on page 14 of Seven Extinction Events.
Normally I love making art. It comes out of my dreams and personal mythology. It allows me to be connected with my spiritual life. When I'm working I forget time and feel totally involved with the object. This is not happening with these books.
I like to start with the pages. Sometimes I am illustrating a dream, a myth I made up or some random sentence from a book that has a personal significance to me. As I work, I know what to do next because there is a story in my head. If I'm on Mars, I need a desert landscape and some Egyptian ruins. If I am walking to a foreign city, I might be lost and need stars to guide me. As I work on the pages, I begin to get an idea for the cover. In this case, I was thinking "rock book, volcano book, fern book" to complete the landscape for the dinosaur book. I knew there wasn't any content, but I didn't think ahead to the consequences. (I'm not doing "show the plants of the late Cretaceous." That is content, but it has no pull for me. I want to make art for emotional and spiritual satisfaction, not for the visual joke.)
I need to either find some content that I can believe in for these books, or set the project aside. It's hard to think about this. I have spent a lot of time on it. Does it make sense to go on and finish enough books to show them together in some way? Or should I cut my losses now and start something I care about on an emotional level? Maybe the question comes down to "do I want to please my audience, or do I want to please myself." I may be able to get these books in shows or published somewhere, but will I be proud of them?
This sentence is on page one of "The View From the Studio Door" by Ted Orland. Didn't I know that? Why do I have to re-learn these things? What a timely reminder. I have been trying to work on the rock book, but there is no joy for me in this series of books, with the exception of the original dinosaur.
This is the seventh event, on page 14 of Seven Extinction Events.
Normally I love making art. It comes out of my dreams and personal mythology. It allows me to be connected with my spiritual life. When I'm working I forget time and feel totally involved with the object. This is not happening with these books.
I like to start with the pages. Sometimes I am illustrating a dream, a myth I made up or some random sentence from a book that has a personal significance to me. As I work, I know what to do next because there is a story in my head. If I'm on Mars, I need a desert landscape and some Egyptian ruins. If I am walking to a foreign city, I might be lost and need stars to guide me. As I work on the pages, I begin to get an idea for the cover. In this case, I was thinking "rock book, volcano book, fern book" to complete the landscape for the dinosaur book. I knew there wasn't any content, but I didn't think ahead to the consequences. (I'm not doing "show the plants of the late Cretaceous." That is content, but it has no pull for me. I want to make art for emotional and spiritual satisfaction, not for the visual joke.)
I need to either find some content that I can believe in for these books, or set the project aside. It's hard to think about this. I have spent a lot of time on it. Does it make sense to go on and finish enough books to show them together in some way? Or should I cut my losses now and start something I care about on an emotional level? Maybe the question comes down to "do I want to please my audience, or do I want to please myself." I may be able to get these books in shows or published somewhere, but will I be proud of them?
Monday, September 18, 2006
Instruction Manual auctioned at Book Arts Jam
On Saturday, October 14th the Book Arts Jam will take place at Foothill College. This is the event people ask me about most often.
From the web site: "Individual exhibitors participating in the 2006 Book Arts Jam include over 30 makers of artists' books, zines, fine press books, hand-made and hand-decorated paper, mail art, limited edition prints, and other book-related works. In addition, you can watch demonstrations in the following specific interest areas: letterpress printing, silkscreen printing, calligraphy, bookbinding using the herringbone stitch over cords, pinhole photography, and silkscreen printing, and participate in hands-on sessions on making pastepaper, designing and making edible books, and making mail art."
There will also be an auction of book related objects. The book above is my donation. I will also be doing a pinhole camera demo.
Sunday, September 10, 2006
Flexible blizzards!
I didn't do much art this weekend. Yesterday I intended to start another fern book, but felt very uninspired. I did clean some in the studio, always a good thing. I went to the BABA meeting today. We made flexagons and blizzard books. It was a nice day, talking a bit to people, making some books. I came home tired and read a little before dinner. Lazy day!

These are the flexagons. I can't really show them in a good light, they are all about movement. Think of the cootie catchers you made in school. They are puzzles, you see the result and can't imagine how to get there. Sally Morgan taught this part of the class. Her Christmas card example was gorgeous. People begged to be included on her Christmas card list.

These are the blizzard books. The one in front holds pages without glue or sewing. I folded the top and bottom of the front cover in to make it line up with the pages. I think I like the frame-like quality of the back cover better. I loved the folding and the tactile quality of the papers. Debbie Kogan taught this part of the class. She had some amazing samples.
I'm not sure if I will be able to incorporate these structures into my book ideas, but they are fun to make. Showing all these books to my husband this evening gave him a good idea for a fun card to make for our niece. And I feel more excited about making the fern books now. It's sometimes good to get out of the studio and have fun.
These are the flexagons. I can't really show them in a good light, they are all about movement. Think of the cootie catchers you made in school. They are puzzles, you see the result and can't imagine how to get there. Sally Morgan taught this part of the class. Her Christmas card example was gorgeous. People begged to be included on her Christmas card list.
These are the blizzard books. The one in front holds pages without glue or sewing. I folded the top and bottom of the front cover in to make it line up with the pages. I think I like the frame-like quality of the back cover better. I loved the folding and the tactile quality of the papers. Debbie Kogan taught this part of the class. She had some amazing samples.
I'm not sure if I will be able to incorporate these structures into my book ideas, but they are fun to make. Showing all these books to my husband this evening gave him a good idea for a fun card to make for our niece. And I feel more excited about making the fern books now. It's sometimes good to get out of the studio and have fun.
Monday, September 04, 2006
Fern Book

I made a fern book this week. The cover is hammered copper, etched in ferric chloride. I patinaed it with liver of sulfur, brushing with a very soft brass brush between layers. The pages are 90 pound watercolor paper, colored with acrylics and Prismacolors. I painted and scribbled all over both sides of a single large sheet of paper. Then I sketched the fern pages around the edges of the paper (to keep the deckle on the bottom of each page). There is another view and larger images on my flickr page in the "Artist's books" set.
I originally thought I wouldn't put any content on the pages. I was thinking a "table of contents" page, some chapter headings, but no collage. In the end I couldn't stand it. I had to have some collage in there. These little bits of photos are from my pinhole camera. I have always been fascinated to see the backgrounds of photos in magazines. There are often odd looking shrubs, people glancing over their shoulders, stray dogs walking by. I love these little bits of real life in the middle of a set-up looking shot. We never have control over everything. That's what these little pieces of photos make me think of. Some are completely unreadable, just fuzzy green and blue shapes.
Saturday, September 02, 2006
Dear Nancy and etching supplies
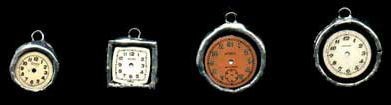
Months ago Nancy Rushton emailed me and asked if I know how she could make charms like these from Wells Ware.
I just found these instructions from Volcano Arts. Nancy, I hope you see this, I'm sorry I've lost your email.
In their "Metal etching tools and supplies" they also have ink pads with solvent based inks for etching on metal. I'm afraid I'm going to have to place an order. (Research, you know.)
Monday, August 28, 2006
The Last Class of Summer

Above: Fish book by Giles Gunn, 2006. See the inside of the book here.
The class in my studio ended today. It was a wonderful group. Every person brought something interesting and valuable to the group. I really enjoyed this class a lot. Sometimes you just connect with people. I am a little sad that it has ended. There were different approaches, different ideas, different problems to solve. That makes it interesting for me. Unfortunately, I didn't have time to take photos of the work. I do have photos from my last class at Cubberley on my web site now.
I still struggle with how much to cover in a class. I want people to go home with a set of basic skills they can use with simple tools. I often feel I'm cramming too much in. I keep cutting things out, and then thinking of another technique that would be fun to cover. Maybe I need to start offering an advanced class once a year. I usually end up feeling things went well, but could have been improved. This time was no exception.
Thursday, August 24, 2006
Did you forget!??
No, I haven't forgotten about this blog! I'm teaching a class in my studio on Sundays right now, and my schedule is weird. I keep thinking Thursday is Saturday, etc. You know. This coming Sunday will be the last meeting, and I'm a little sad about it. It's a very nice group of people.

I had some time in the studio this week. Yesterday afternoon I made a rock. It's a funny looking lump here, actually a two-part rock.

Here is is open. It's about 2.5 inches wide, and will be the cover for a rock book. I hammered it out of 18 gauge copper. It may meed some refining, and I'm not sure how to do the pages. But it was lovely to have some time to just focus on a project.
I am also trying to find a metal shear. I would like one that cuts up to 14 gauge brass, doesn't take too much workshop space, and doesn't cost a bundle. I haven't exactly defined "bundle" for my self. I just sold a book and am delighted to have unexpected money for tools. There is one in the Rio Grande catalog, which takes a lot of table space, but looks appealing. There is one in the Otto Frei catalog, which they may not have anymore, costs a lot, and takes very little table space. And I have a call in to a local place, that has metalworking tools. I hope they call me back today. After waiting for years to buy this shear, I'm feeling impatient to go ahead.
Today I want to make several fern book covers. I also need to get my slide application together for the Book Arts Jam. That is the next thing on my event horizon, and I am looking forward to it already. I hope to have a major portion of these books finished so they can be in the exhibition BABA organizes as part of the Jam.
I had some time in the studio this week. Yesterday afternoon I made a rock. It's a funny looking lump here, actually a two-part rock.
Here is is open. It's about 2.5 inches wide, and will be the cover for a rock book. I hammered it out of 18 gauge copper. It may meed some refining, and I'm not sure how to do the pages. But it was lovely to have some time to just focus on a project.
I am also trying to find a metal shear. I would like one that cuts up to 14 gauge brass, doesn't take too much workshop space, and doesn't cost a bundle. I haven't exactly defined "bundle" for my self. I just sold a book and am delighted to have unexpected money for tools. There is one in the Rio Grande catalog, which takes a lot of table space, but looks appealing. There is one in the Otto Frei catalog, which they may not have anymore, costs a lot, and takes very little table space. And I have a call in to a local place, that has metalworking tools. I hope they call me back today. After waiting for years to buy this shear, I'm feeling impatient to go ahead.
Today I want to make several fern book covers. I also need to get my slide application together for the Book Arts Jam. That is the next thing on my event horizon, and I am looking forward to it already. I hope to have a major portion of these books finished so they can be in the exhibition BABA organizes as part of the Jam.
Sunday, August 13, 2006
What keeps you from making art?

I made this box in Inge Infante's Box Art class. I wouldn't say it's the worst experiment I've ever done, by a long shot. But it doesn't fit with the work I usually "publish." (On my web site or in shows.) I like it, but I'm not satisfied with it. I want to make boxes and don't really know where I'm going with the idea.
I made a few boxes, mostly in my student days. I love boxes, almost as much as books. So why don't I just make some now? I have one on my workbench right now that is two-thirds finished. And abandoned.
I struggle with this. Due to lack of time, my cowardice and some other unknown factors, I can't just dive in and do it. I know I need to make some things that will be failures. I know the only way to start something new is to do it, make mistakes and learn from them. But knowing something is not the same as doing it.
How do you give yourself time to experiment and not be serious? Some very interesting discoveries can be made when you're playing. I can't always do it, so I can't give you an easy answer.
What sometimes works for me is to promise myself I will show it to no one. I plan to make absolute garbage, and then destroy it, or hide it. I have plenty of bad art in my studio. But I can't get rid of it, because there are ideas in it that I love, and will use in the future.
After writing this, I think I should go ahead and buy the metal shear I have been longing for. It time to get to work, right?
Thursday, August 10, 2006
Photo Report
I have been struggling to get some decent pictures of some of my books. And I'm almost ready to eat my previous blog entry. It is hard, takes a lot of time, and reminds me how untechnical I am.

This was taken using the set-up shown in my flickr pages, with one change. I am hanging a black sheet in front to cast a shadow. Here is a pinhole photo of the set-up, from the camera's view point.
I took some photos a few days ago that I thought were really great, then I enlarged one on the computer and saw boulders of dust! Back to the drawing board. This probably could have been avoided. I have notes to myself in various places, but I often don't read them. I'm thinking a printout in the camera bag might help.
My current notes:
*Set the remote - it stays set until the camera is turned off.
*Check for dust - enlarge photo to 100%, dust shows like boulders.
*Check exposure - bracket even with the digital.
*I can sort of set up the shot and check it with the digital camera before taking the film shots, but the film camera needs some physical adjustment. It doesn't zoom like the digital and it is larger. So I can't just clamp the film camera into the exact spot the digital was in and snap the picture.
*Cloth hanging down casts a nice shadow.
*A piece of Davey board with string tied from corner to opposite corner, making it bow, makes a nice sweep for small scale.
*Maybe avoid black backgrounds - dust is invisible to the naked eye, but very apparent to the camera. Maybe the longer exposure needed for the black background makes the dust more apparent?

Here is my favorite photo so far.
Last night was the last meeting of my summer class at Cubberley. The students were great, and I will have some pictures of their books and maybe a few of the students working. I hope they came out, I had two camera batteries and they both ran out of charge quickly.
Last Sunday was the first meeting of a 15 hours class that I'm doing in my studio, so there will be photos from that class in a week or two.
I'll report back soon on the photo project.
This was taken using the set-up shown in my flickr pages, with one change. I am hanging a black sheet in front to cast a shadow. Here is a pinhole photo of the set-up, from the camera's view point.
I took some photos a few days ago that I thought were really great, then I enlarged one on the computer and saw boulders of dust! Back to the drawing board. This probably could have been avoided. I have notes to myself in various places, but I often don't read them. I'm thinking a printout in the camera bag might help.
My current notes:
*Set the remote - it stays set until the camera is turned off.
*Check for dust - enlarge photo to 100%, dust shows like boulders.
*Check exposure - bracket even with the digital.
*I can sort of set up the shot and check it with the digital camera before taking the film shots, but the film camera needs some physical adjustment. It doesn't zoom like the digital and it is larger. So I can't just clamp the film camera into the exact spot the digital was in and snap the picture.
*Cloth hanging down casts a nice shadow.
*A piece of Davey board with string tied from corner to opposite corner, making it bow, makes a nice sweep for small scale.
*Maybe avoid black backgrounds - dust is invisible to the naked eye, but very apparent to the camera. Maybe the longer exposure needed for the black background makes the dust more apparent?
Here is my favorite photo so far.
Last night was the last meeting of my summer class at Cubberley. The students were great, and I will have some pictures of their books and maybe a few of the students working. I hope they came out, I had two camera batteries and they both ran out of charge quickly.
Last Sunday was the first meeting of a 15 hours class that I'm doing in my studio, so there will be photos from that class in a week or two.
I'll report back soon on the photo project.
Sunday, July 30, 2006
Shoot!

This is Lorgnette for a Fish Goddess, ©1997. The materials are silver, brass, sea shells and kelp.
I have been taking a bunch of photos this week. I need some nice ones for the slide show at the Book Arts Jam. Plus I would like to get some more images on my web site. And there is a publication I'm thinking of sending an application to. There are lots of "buts" in there, that you can't see in print. What are they? Well, I do have some photos I could send to the Jam. But I am not totally happy with them. I would love to have more images on my web site, but it's a low priority at this moment. (Although I do have a new gallery planned.) And the publication? It's Lark books, and they "strongly prefer film." I do understand that digital has much less information than film. But it's so hard to get a good shot with film. So today I have been taking digital photos. I'm happy with a few of them. (about 10 out of 100.)
And why don't I "just" get a professional to do the photos? I didn't like the results when I tried several professionals. And the expense for just a few images seems incredibly high to me. I went to the last BABA Sunday meeting on photography and people there seemed to agree, you have to take each book as a different case. People there were suggesting experimenting with each book. And why should I pay someone to do that? Or why should I pay someone to do a bad job. I can do an okay job myself, and I will probably be happier with how the book is presented. I am just not that good at the lighting. I keep trying to get better, and I think I am improving. I definitely understand more now than a few years ago. It's possible I will be rejected from Lark books, for not having slides, for not having good lighting, for not sending whatever the juror likes. But I'll have a bunch of images to put on my web site.
Here's a flickr set with photos of my last set-up. There are comments on the photos, and they will enlarge. (To enlarge: when you're on the main photo page, with "bertmac's photos" at the top, click on the photo. Then click on "all sizes" at the top of the image.)
I did get some good ideas at the BABA meeting:
1. Dark backgrounds can work with enough light on the book/object.
2. Use the digital camera to get all set-up before taking the final shots on film.
3. You can now buy daylight bulbs and daylight film for slides.
4. Take some shots from the back - they may be very interesting and useful.
5. Their rolls of paper were controlled by a chain. I think they have some tension on them, so you can adjust the curve of the paper. This may be the problem with the photo above. The curve might be too sharp instead of gradual.
I also got a lot of good ideas for my set-up here. This is a web site for jewelers, but the photo information is useful, and easy to scale up to larger objects. One thing suggested at ganoksin is using mirrors to reflect light onto your object. This works great for metals, but I'm not sure how it will translate into paper. I need to try that this week.
Now it's time to take photos!
Sunday, July 23, 2006
It's hot, hot, hot!
It's been much hotter than usual here all week. Because we don't have air conditioning, I have been putting off all kinds of things. I wanted to take some photos this week, but the big lights I use are way too hot.
Instead I have been working on my website. I added three older books. They are all in gallery 3 on my web site. Here are direct links:
Duck Dreams
Celestial Navigator
We can see by starlight

I also made a matchbox pinhole camera. Isn't it cute?
I starting taking some notes for the demo at the Book Arts Jam, on October 14th. My goal is to have the demo ready soon, and to put it on my web site as a tutorial. I would also like to get to work on my fern book, which will make use of all these pinhole photos.
Until next time, keep cool!
Instead I have been working on my website. I added three older books. They are all in gallery 3 on my web site. Here are direct links:
Duck Dreams
Celestial Navigator
We can see by starlight
I also made a matchbox pinhole camera. Isn't it cute?
I starting taking some notes for the demo at the Book Arts Jam, on October 14th. My goal is to have the demo ready soon, and to put it on my web site as a tutorial. I would also like to get to work on my fern book, which will make use of all these pinhole photos.
Until next time, keep cool!
Wednesday, July 19, 2006
Dirty it up!
I took a fantastic Box Art class with Inge Infante this past spring at the Community School of Music and Art in Mountain View, California.

Here's Inge, inspecting a student's box in the Box Art class. She is a wonderful teacher. Her explanations are clear, she's very helpful when you're stuck, and she doesn't have any "secret" techniques that she won't talk about. She brought in some of her finished boxes to show us how the techniques look. I have seen some of these techniques demoed (sorry, I know that's not a "real" word) before, but hadn't realized how I could make them work for me. Inge's clear instructions and the examples she brought in both helped me to see the potential.
Now I am suddenly so much into transfers and the layering of images. I recently added some collage to a box I made for a little book. I wanted the collage on the box to match the collages in the book. It was hard to go back in time and do the old style collage. I kept thinking "it needs another layer," and "that paper is too clean and white." I view this a a very good thing, and have Inge to thank for it.

Here are some of the students. The class room was a nice space, the other students were great people. I loved all the little tips Inge had for us. The reasonably priced black gesso from Nova Color mentioned in a previous post was one of her tips. Inge is teaching a class at the Community School of Music and Art this fall that will cover boxes (assemblage), collage and altering books.
"Dirty it up" is often what she often says when a work in progress seems boring or isn't going anywhere.
Here's Inge, inspecting a student's box in the Box Art class. She is a wonderful teacher. Her explanations are clear, she's very helpful when you're stuck, and she doesn't have any "secret" techniques that she won't talk about. She brought in some of her finished boxes to show us how the techniques look. I have seen some of these techniques demoed (sorry, I know that's not a "real" word) before, but hadn't realized how I could make them work for me. Inge's clear instructions and the examples she brought in both helped me to see the potential.
Now I am suddenly so much into transfers and the layering of images. I recently added some collage to a box I made for a little book. I wanted the collage on the box to match the collages in the book. It was hard to go back in time and do the old style collage. I kept thinking "it needs another layer," and "that paper is too clean and white." I view this a a very good thing, and have Inge to thank for it.
Here are some of the students. The class room was a nice space, the other students were great people. I loved all the little tips Inge had for us. The reasonably priced black gesso from Nova Color mentioned in a previous post was one of her tips. Inge is teaching a class at the Community School of Music and Art this fall that will cover boxes (assemblage), collage and altering books.
"Dirty it up" is often what she often says when a work in progress seems boring or isn't going anywhere.
Monday, July 17, 2006
Small progress on huge volcano book
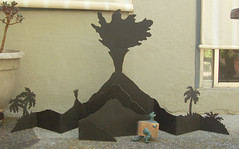
I have finished the hinges for the big volcano book. (If you click on the image you can see it at Flickr. Clicking on "all sizes" will show a larger image) It's so nice to see it standing up. I included the dinosaur book for size comparison. I decided to add some little slopes at the end of the volcano, it seemed to stop too abruptly. I also had to do a number of tests to get the hinges the way I wanted them. My idea was that they should only fold one way, and they should allow a little extra space between the "pages" so I could add collage or metal to the pages.

Here it is, folded and lying on my worktable. I included a roll of painter's tape for scale. It's 32 inches high, and huge. I'm finding it very hard to work on because it's so awkward to turn over or move around.
Next I need to collage on the volcano. I'm not sure how this will look yet, I plan to start tearing out bits of paper and arranging them. I do have a cunning plan, which "cannot fail." (But of course will fail, or will present some other problem.)
I have also been distracted by the pinhole photography. I need a group of plant images for a fern book, and the pinhole effect seems perfect for that. Next I need to figure out how to transfer them. My first attempt wasn't totally successful.
And I volunteered to do a pinhole photography demo at the Book Arts Jam, presented by the Bay Area Book Artists on October 14th. So I'm also experimenting more with handmade cameras. I think the demo will be a matchbox pinhole camera. These seem so easy to make, and they take 35 mm film, which is less expensive to buy and to process. (I have a two-or-three-rolls a week habit at this point.) I am still adding pinhole links to my del.icio.us page, although at a slower pace.
Friday, July 07, 2006
The Hole Story II
Some images from the minty cam:

Both these photos are taken with the minty cam. I like the mysterious, atmospheric effect and the vignetting. The pinhole is .1 mm wide. The exposures were for 4 seconds (as I count) in the shade. I think I might need slightly longer exposures in the shade. Mixed sun and shade seems problematic, with strong white in the sun looking overexposed, and the shade looking underexposed.

Now that I have sort of a sense of what works and what doesn't, I need to figure out how to use these in collage. I think there is plenty of potential. I already know I need some good photos of plants for my fern book.
Plus this has been a really fun week. I did lots of pinhole photography, had fun with my son and enjoyed the time away from the stuff I usually have to do. I had help with the cooking (thank you Jim) and didn't really need to accomplish anything. Time went by way too fast and I'm sad that tomorrow is the last day of the vacation.
Both these photos are taken with the minty cam. I like the mysterious, atmospheric effect and the vignetting. The pinhole is .1 mm wide. The exposures were for 4 seconds (as I count) in the shade. I think I might need slightly longer exposures in the shade. Mixed sun and shade seems problematic, with strong white in the sun looking overexposed, and the shade looking underexposed.
Now that I have sort of a sense of what works and what doesn't, I need to figure out how to use these in collage. I think there is plenty of potential. I already know I need some good photos of plants for my fern book.
Plus this has been a really fun week. I did lots of pinhole photography, had fun with my son and enjoyed the time away from the stuff I usually have to do. I had help with the cooking (thank you Jim) and didn't really need to accomplish anything. Time went by way too fast and I'm sad that tomorrow is the last day of the vacation.
Thursday, July 06, 2006
The Hole Story
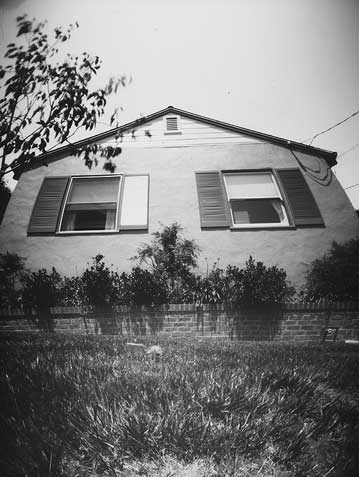
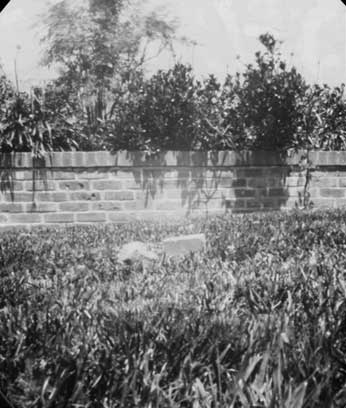
One of my first pinhole images. I took this around 11 am, in full sun, for about 50 seconds, with my oatmeal cam.
I also made a couple of cameras this week.
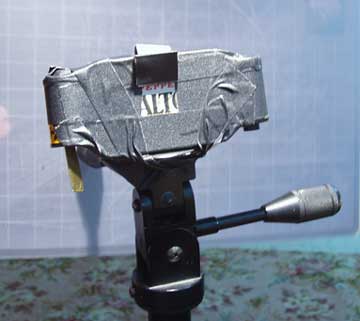
Here is my minty fresh camera.
This is an Altoids tin with a pinhole mounted in the front. I cut a slit on either end, folded down the rough edges the best I could, and taped over the rough edges with gaffer's tape. Then the roll of film is attached to one side, film is pulled through and attached to an empty spool. The camera has to be mummified in tape to block all possible light leeks. The winding mechanism is a piece of brass jammed into the end of the cartridge. You can see it on the lower left part of the camera. The link has a better description of how to make the camera. I took a roll of film on the 4th, trying to capture some fireworks. It was a total failure. Yesterday I took a roll in our yard, which I will take to have developed tomorrow.
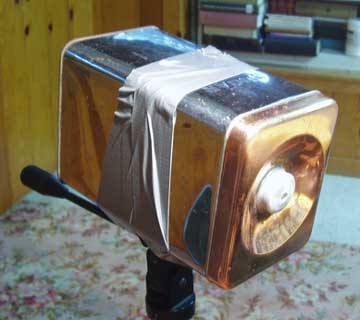
And here is the sugarcam (made from an old sugar cannister). The pinhole is in the handle of the lid. The lid fell off the first time I used it, so now I'm taping it with some electrical tape. I am also taping these cameras to my tripod, or setting them on the ground.
This image of the front of our house was taken with the sugarcam at the same time, and from the same spot, as the pinhole image above. You can see I have to trim the corners a bit to make the paper fit into the sugarcam.
One of my invisible readers pointed out that I should have included links for Freestyle in my last post. And the address for Kaufmann's is 154 W. 25th Ave, San Mateo, California.
I have some pinhole related links on del.icio.us.
And check out my son's flickr photos. He took some really good pinhole images.
Saturday, June 24, 2006
Pinhole Distractions
I have been working on the big volcano book this weekend. All the parts are cut out and painted. I made several tests to see if I could hinge the parts together with cloth. I found that brushing Imperial batiste with Polyvinyl Acetate glue made it pretty tough. It doesn't unravel, and is easily painted with black gesso.
I am also distracted by this:
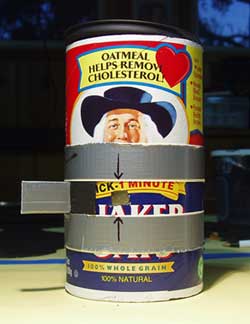
It's my oatmeal box pinhole camera. There are instructions here. My son is coming for a visit next week. We usually have "Art Camp" during the summer visits. This year he wants to make pinhole cameras. I have been wanting to try a pinhole, but didn't want to bother with the time required to turn the bathroom into a darkroom. However, since there will be two of us, the scales were tipped. I also went to Flickr and found an incredible number of fantastic photos taken in pinhole cameras of various kinds. Just search on "pinhole" or "homemadecamera." Here is my favorite
There is something so appealing about making such a low tech camera. I'm not technical and can't remember all those photography rules. So the thought of no lens, no filters, no whatever really appeals to me. When I went to our local photo store, (Kaufmann's on 25th in San Mateo), the guys were so nice. I thought they would think pinhole photography was too funky and weird. But one guy was very helpful finding small packages of chemicals and paper. He told me that lots of people do this for art projects. Another guy told me how great the Holgas are, and to check out Pinhole Journal. A customer in the store told me where to get black-out material. When I called Freestyle to get the rest of the supplies, the woman on the phone was so nice and enthusiastic. She told me about her matchbox pinhole, and Holga photos. (If you haven't heard of them, Holgas are $20 plastic cameras. They have light leaks, the back can fall off, and they take very atmospheric photos. Check Flickr for these, too.) I feel like I've stepped through a camera lens into the pinhole world. People are instantly friendly.
Looking at all the pinhole photos on Flickr gave me a real energy boost. It's fun to have a new interest, I feel charged up and excited about it. I think it will feed my creative energy in general. I can use the photos in collage, and already have some plans for my fern book. There are so many things to explore and try out, I can get excited about something and get completely off track on my art projects. So right now I'm trying to restrict the photo stuff to the evenings.
Who knows how these photos will turn out. I did find this calculator, which I hope will help. I'll post photos next week if anything is at all presentable.
I am also distracted by this:
It's my oatmeal box pinhole camera. There are instructions here. My son is coming for a visit next week. We usually have "Art Camp" during the summer visits. This year he wants to make pinhole cameras. I have been wanting to try a pinhole, but didn't want to bother with the time required to turn the bathroom into a darkroom. However, since there will be two of us, the scales were tipped. I also went to Flickr and found an incredible number of fantastic photos taken in pinhole cameras of various kinds. Just search on "pinhole" or "homemadecamera." Here is my favorite
There is something so appealing about making such a low tech camera. I'm not technical and can't remember all those photography rules. So the thought of no lens, no filters, no whatever really appeals to me. When I went to our local photo store, (Kaufmann's on 25th in San Mateo), the guys were so nice. I thought they would think pinhole photography was too funky and weird. But one guy was very helpful finding small packages of chemicals and paper. He told me that lots of people do this for art projects. Another guy told me how great the Holgas are, and to check out Pinhole Journal. A customer in the store told me where to get black-out material. When I called Freestyle to get the rest of the supplies, the woman on the phone was so nice and enthusiastic. She told me about her matchbox pinhole, and Holga photos. (If you haven't heard of them, Holgas are $20 plastic cameras. They have light leaks, the back can fall off, and they take very atmospheric photos. Check Flickr for these, too.) I feel like I've stepped through a camera lens into the pinhole world. People are instantly friendly.
Looking at all the pinhole photos on Flickr gave me a real energy boost. It's fun to have a new interest, I feel charged up and excited about it. I think it will feed my creative energy in general. I can use the photos in collage, and already have some plans for my fern book. There are so many things to explore and try out, I can get excited about something and get completely off track on my art projects. So right now I'm trying to restrict the photo stuff to the evenings.
Who knows how these photos will turn out. I did find this calculator, which I hope will help. I'll post photos next week if anything is at all presentable.
Saturday, June 17, 2006
Metal Techniques Class in Palo Alto

Above: "It's not broken" ©2005, 7 x 6.5 x 1.5 inches. Found objects, fabricated. I made this altar for a Bay Area Book Artists concept exchange. I used wire, nuts and bolts, and glue to attach things.
I will be teaching a class in the Cubberley Jewelry Studio in Palo Alto, beginning July 12. We will make metal books using jewelry tools and techniques.
The class will cover basic metalworking tools, including:
Shears – used to cut simple shapes from some materials
Jeweler’s saw – used to cut intricate shapes from most materials
Files – handy for cleaning up edges of metal
Flex shaft – good for drilling small holes for rivets or tiny nuts and bolts
And cold connection techniques, including:
Three styles of rivets (tube, ear post and wire)
Small nuts and bolts
Jump ring bindings
Spiral bindings
Also:
Patinas for copper
Textures on metals
With these tools you can cut shapes from metals, book board and plastic. These shapes can be used as book pages or they can be attached to metal, plastic or book board pages. You can also attach many found objects to your pages using the cold connection technques.
The student gallery on my web site has work by previous workshop students.
The class meets Wednesdays, July 12 to August 9, 7 to 10 pm. We will meet in the jewelry studio at Cubberley, 4000 Middlefield Road, Palo Alto, room # F-7. Minimum of 8, maximum of 15 people. $96 for Palo Alto residents, $110 for others, $15 materials fee. Go here to download the adult schedule as a pdf, and for information on registering. You can also download the adult classes section by going to the workshops page on my website.
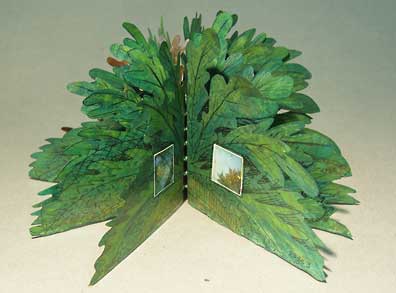
A Huge Volcano Book
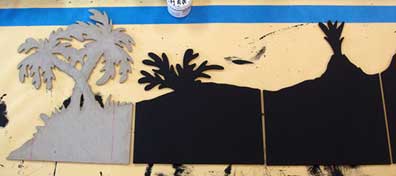
Above is the left "wing" of my big volcano book. I have been cutting out the pages this week. The material is Davey board. I'm using a jeweler's saw with an 11 inch throat and a number 3 saw blade. The saw is fairly coarse and it tears the back side of the details. I need to paint Polyvinyl Acetate, a very strong glue, on the edges. I can both glue down the little tears and make the edges a little stronger with the PVA. I'm bothered by the big bushy fern in this picture. It looks out of place to me, but it won't be too hard to cut another one. Maybe I'll just put a clump of grass there.

This is the center panel, the big volcano. I can't wait to see this one standing up. It's 32 inches high!

Here's the right hand "wing." Only one more panel to cut out. There will also be an accordion fold book in the center. After the panels are cut out and the edges are re-inforced with the PVA, I'm painting them with black gesso. I love this stuff. It's very expensive if you buy it from an art supply store. I got this from Nova Color. A gallon is $27. I can't remember what the shipping was, but it was a good deal. The downside is that you need to transfer it into smaller containers, unless you're going to use it up quickly. Luckily I had some dish soap containers around. It's thick and goopy but goes through a largish funnel okay. If you do this, wear some of those disposable painter's gloves. And do it in your garage if you can.
Subscribe to:
Posts (Atom)
