In my first entry, I said I thought the blog would be good for my students. I hope this doesn’t convey the impression that other people can’t ask questions, or weren’t invited to participate. Anyone who wants to ask about things is welcome to.
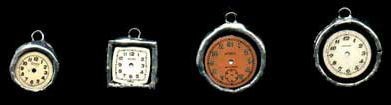
Nancy Rushton emailed me and asked if I know how she could make charms like these from Wells Ware.
If anyone out there has ideas for Nancy, please chime in. If you’re more comfortable emailing me directly, that’s fine. I’ll post it in the blog. Let me know if you want to be completely anonymous.
Here are the possibilities that come to mind:
1. They look like they're soldered with low temperature solder (using a soldering iron). I might be wrong about that. I don't teach low temperature soldering, but I don't think it's hard to learn. I use what's actually called braising (jewelers usually say soldering when they mean braising), and it couldn't be done with glass in place. It's much hotter than low temperature soldering.
2. You could make a bezel, assembling it with braising, drop your image and glass in, and fold over the edge to hold it in place. You would make a “sandwich” with layers of glass and the photo image, and then bend the bezel around it to fit.
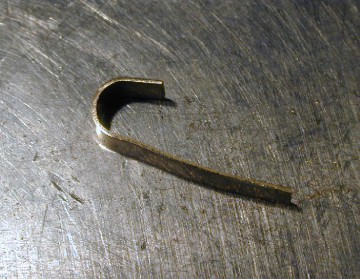
Here the bezel is being bent to shape. Normally I form the bezel around the object I want to hold with it. This is from Liz’s Jewelry Bench. She has a bezel making demo on her web site. Most bezels have a solid metal back, although you could cut a window in the back.
3. To make a two-sided charm, you could use fine silver bezel wire. It comes in long strips. You would have to bend it to fit, and solder or braise the seam. Then you could fold both the front and back edges over to hold your glass. This method assumes you want a two-sided charm. You would also have to solder on a ring for hanging.
4. Another way to sandwich glass and a small image would be to use metal foil tape around the edge. It's very low tech. You would have to embed a wire for your hanging loop. I have seen metal tape in copper and aluminum, but don’t remember where.
5. Another possibility would be to buy a bezel cup and drop everything into it, then fold over the edges.
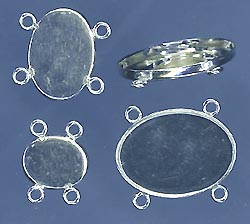
These bezel cups are from Monster Slayer.
The sides on these look too low for your needs. I thought Rio Grande had a big variety of shapes and depths. Now I can’t find the bigger, deeper bezel cups in the Rio Grande catalog. A local jewelry supply place might have some. Make sure you know the depth of your “sandwich” when you go. You would have to cut your glass to fit the pre-made bezel cup.
I am assuming you can cut glass. You could also use Plexiglas, which could be easily cut with a jeweler's saw. Of course it would possible scratch over time. But you could scratch a design in it if desired.
The next two ideas depend on the baking temperature of the materials, and the tolerance for heat of the glass or Plexiglas and photos. I don’t know anything about this.
6. Fimo or a similar material might work. I think you could embed a hanging wire, too. I don’t know much about Fimo, but when I use it, I don’t bake it in the oven that I cook our food in. Never mix art materials and cooking. I do know that Primo bakes at 275 degrees.
7. Precious Metal Clay might work. It’s basically silver (or gold) made somehow into a Fimo-like material and is baked in a similar manner. I assume it also has the same gas producing quality when baked, so you might not want to bake it in your household oven. I’ve never used this stuff, but it’s become very popular.
When you find a solution, I would love to hear about it. They are “charming” charms.

2 comments:
Hi! I'm so glad I found your blog! I'm try to become proficient in soldering the kind of charms pictured... I know the process, I'm just having a hard time getting the seams to stay covered! I'm going to book mark your blog so I can check back and learn more! Cheers!
Rather than using glass, I find that placing the object in the bezel and pouring a layer of clear epoxy resin (I use envirotex lite) works perfectly. It dries glassy smooth and is durable and scratch resistant.
Post a Comment