Showing posts with label Mark Making. Show all posts

Thursday, August 12, 2021

Tetrapak Mark Making and Printing Tests


Tetrapak mark making tools test
I always have to make a book and take a photo. Even the funky tests. Single sheet binding, instructions from Keith Smith.

I have been testing a lot of mark making tools on Tetrapak. Above is a little book I made myself. Below are all the tests. Most of the tools I used are in the photos. The paper is Stonehenge, ink is Akua carbon black. Not all the tests printed equally well, but it's information, not beauty that I'm looking for.

Tetrapak mark making test 2021 Judith Hoffman
Fine line applicator with Golden high flow paint. Hard to control, hard to write backwards. Take a while to dry thouroughly.

Tetrapak mark making test 2021 Judith Hoffman
PVA sprayed on with toothbrush, keep it light for a texture. Lots of small spots end up making a dark area.

Tetrapak mark making test 2021 Judith Hoffman
Liquitex clear gesso, center is the tetrapak, right is Blick white acrylic, brushed on and scribbled with brush handle end. I need to play more with the brush handle marks.

Tetrapak mark making test 2021 Judith Hoffman
Utrecht mat medium sprayed on with spray tool. Keep it light to get spots, more spots will hold more ink. Hard to control but I love the bigger spots.

Tetrapak mark making test 2021 Judith Hoffman
Left dark area is an etching tool that scratches many fine lines, the grids are pieces of screening. I couldn't find most of them - the heavy plastic one above was used, also the wire. it's twisted very fine wire. These are embossed into the tetrapak.

Tetrapak mark making test 2021 Judith Hoffman
Staples under aluminum tape on the left and above right, hammered staples on the right.
 If you try this be careful - you don't want to make permanent marks on your rollers. Extra padding is a good idea.
Tetrapak mark making test 2021 Judith Hoffman
Aluminum tape, torn for the two horizontal pieces, crumpled for vertical piece. The long horizontal line is a fold in the tetrapak.
Tetrapak mark making test 2021 Judith Hoffman
Above: screwdriver blade, Below square tubing. Press down hard.
 The screwdriver blade is notched.
Tetrapak mark making test 2021 Judith Hoffman
Left: sand paper scratches, right Wiggle Jiggle writer with scribe taped on.
 It's a kid's fun drawing tool. On Amazon.
Tetrapak mark making test 2021 Judith Hoffman
Marbling comb. On the left I tried brushing on some mat medium. I want to use these in collage. Turns out the Akua dries slowly, but is finally supposed to be waterproof.

Tetrapak mark making test 2021 Judith Hoffman
Left some kind of etching tool - makes many very fine lines. Center: fork, Right: nail set, although maybe not the one in the photo. I think it had a larger circle end.

Tetrapak mark making test 2021 Judith Hoffman
Wheels with spikes. For leather working and sewing. These are hard to ink well. A very soft toothbrush seems best.

Tetrapak mark making test 2021 Judith Hoffman
Papermate ballpoint pen, wheel with spikes.

Tetrapak mark making test 2021 Judith Hoffman
Energel 0.5 pen

Tetrapak mark making test 2021 Judith Hoffman
Left: twisted scribe, right: scalpel

Tetrapak mark making test 2021 Judith Hoffman
Circle test: Left twisted scribe. The five is cut out. Right: nut cracker pick. Easier to draw a circle. I am having trouble adjusting to the different feeling between a pen and the scribes which are very sharp and only really work when I pull them toward me.

Tetrapak mark making test 2021 Judith Hoffman
Left: Jetstream pen .23, nut pick, Right Cork handled scribe. Just as sharp as the twisted scribe but easier on the hand.

Tetrapak mark making test 2021 Judith Hoffman
Uni Jetstream pen .28, Uni Jetstream 3, .38, Pentel energel .5, Papermate 1. They all look about the same when printed. I was hoping for a finer line from the finer tips.

Tetrapak mark making test 2021 Judith Hoffman
Top: wire tool with handle, Bottom: cork handled scribe, trying light and firm pressures.

Tetrapak mark making test 2021 Judith Hoffman
Polymer clay tool with embedded nails. I made this one years ago.

Tetrapak mark making test 2021 Judith Hoffman
Polymer clay tool, point on one end, circle on the other. The circle is like a nail set tool. The point is fairly smooth. I need to test this more.

Protecting the ink from cats
My system to leave the ink on the glass plate. We have a cat, he mostly doesn't walk on the table but he might. I should put a weight on top. They claim the Akua ink doesn't dry on non-porous surfaces, so it can sit out until you use it up.


Tuesday, March 30, 2021

Mostly Handmade Brushes

handmade brushes Judith Hoffman
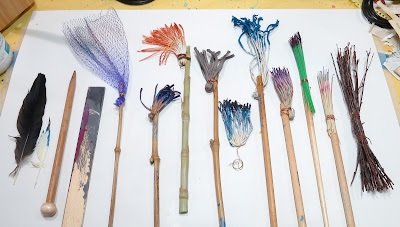
1. several feathers 2. large knitting needle 3. paint stick 4. vegetable netting 5. rubber bands 6. nylon string 7. shoe string 8. short cotton string 9. long cotton string 10. gardening twine 11. long green plastic broom straws 12. short tan plastic broom straws 13. tree branches


In this post I will show you some of the handmade brushes I made as part of Jane Davies' Mark Making class, and also the marks some make. See my previous post for a summary of the class. And if you are interested in the question of awkwardness and balance in art, check out the thoughtful comments people left on my last blog post.

There is lots to think about and no one clear answer. 

So now about the brushes (as usual all these images should enlarge):
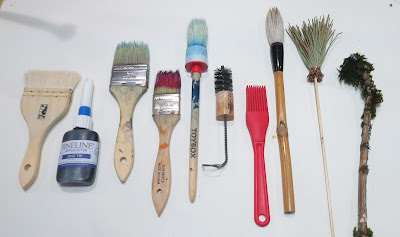
More brushes to experiment with

Most of these are clearly not handmade but I experimented with them to see what kinds of marks they would make. 1. goat hair brush 2. Fineline applicator 3. chip brush old but fairly clean 4. chip brush all stuck together 5. stencil brush 6. splatter tool 7. silicon basting brush 8. sumie brush 9. dried pine needles 10. moss on a stick.


more handmade brushes
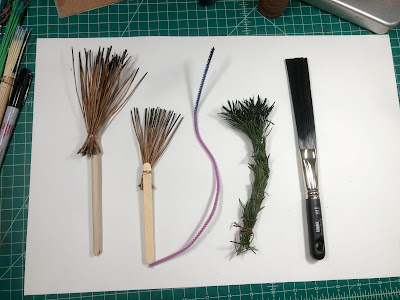
I forgot to include these brushes in the first photo. 1. long pine needles 2. short pine needles 3. pipe cleaner (chenille stick?) 4. three Douglas fir branches tied together. 5. splatter stick from Dick Blick.


I won't post all the tests I did, I have stacks of paper with marks. In general for me, the string and twig brushes make the best marks. I like a brush that holds a fair amount of ink or paint. (I used high flow acrylic paint for my tests - drawing ink would also work). I love the big splats and small splatters most of these brushes make - they are so dynamic. There is also an element of surprise, although practice helps to get marks in the right place, more or less. The main thing I gained from all this testing is to find that I love the process of mark making and I am now more aware of contrasts between marks, shapes, size, etc. Because of this new awaeness, I think this was a worthwhile way to spend a month. There are marks I really like and marks that leave me cold, but none are completely terrible. I am already cutting or tearing up these papers to use bits in collage.
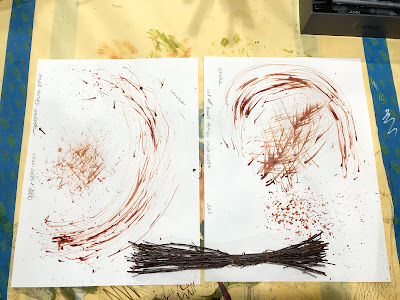
I would definitely encourage you to try this yourself. Reading about these things is not the same as getting down and dirty. All these brushes were made quickly. I figured I could make a more attractive version of the ones I like to use. If you search online there are lots of handmade brushes, some are really beautiful. Ink or high flow acrylics are good for testing. You could also use some water in acrylics. The colors would be less intense, but that might be good. If you post experiments anywhere, I'd love to see them.
Gardening twine - this is fairly absorbent, hard to control the marks but brush-like enough to feel familiar. Would make a big splat if loaded with paint.

Large ball chain - what striking marks. I can't imagine putting these on a drawing, but a torn out piece of this would be good in a collage, maybe in the background of a drawing.
Three Douglas fir branches tied together. These were fresh, very pliable.  The stiffness makes them very nice to scribble with. 
Fresh pine needles. The dried ones fell apart right away. The fresh ones lasted a week then started falling apart. I really like the materials that splay out. They make a nice scratchy mark. This one also held enough paint to make a wonderful splat.


A bundle of sticks. Tied in two places to make a long and short brush. I keep thinking different lengths would make different marks, but they don't make much difference. The sticks are slender so they make a nice scratchy mark, but don't hold a lot of paint.
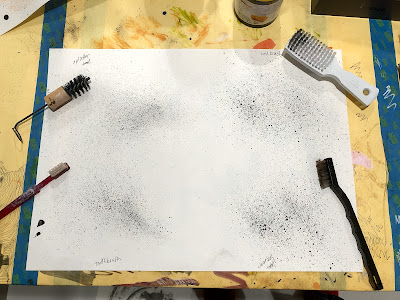
I will include some commercial brushes because all this mark making inspired me to get out some brushes I have had for years and see what they can do. I love these little sprays of paint, I wanted to test the different sizes. My favorite for texture and size is the scrubbing brush, lower right. Upper left is a splatter tool, I think you can get one at Dick Blick. The toothbrush is an antique - it's flat and makes a nice small splatter.
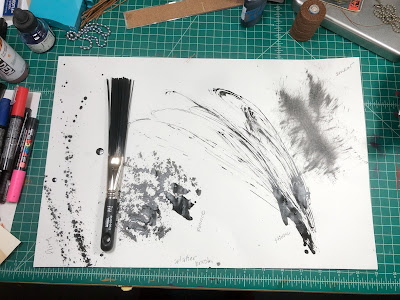
This is a splatter brush from Dick Blick - it holds a ton of paint and makes a huge splat.  It can also be used like a toothbrush, running your finger across the ends of the brush. Or scrub with it for other marks. A horizontal fling makes a splatter that has a lot of direction.
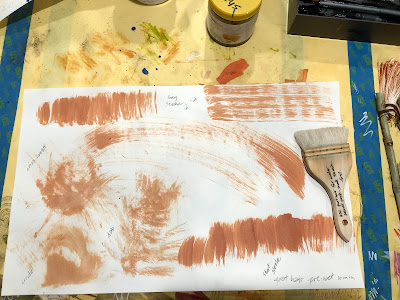
This goat hair brush is very soft - I bought it for paste papers. I didn't expect it to be interesting because I tend to like stiff brushes, but I do like the wide dry brush marks. When ever I spend a lot on a brush I write the price on it, so I don't do some dumb thing like scrub some paint into coarse paper. (It says $32. goat hair for water based paste. Soak 30 minutes first.)


I can't add a caption to the image above - I just had to include it. The grey swoosh was made with a paint stirring stick on it's side, drug though a little house paint. The ecru drips are house paint drips. This is one of my favorite from the whole month.

Take care, be good. And definitely be well.