Sunday, August 30, 2020

Preparing for Inktober I made two small sketchbooks from envelopes


I have been saving envelopes for a couple of years, ever since I bought a few sketchbooks made with mail from Helen Coldwell at badbooks on etsy. I used one of Helen's books for Inktober in 2018 and enjoyed it very much. She isn't making the mailed format any more, but does have mixed paper books in several sizes. I just recently bought a couple of those, they are equally fun, and I didn't have to make them.


This year I thought I should take out the big pile of envelopes and make them into something. I did add in some graph paper, some gridded paper, a few other things. But it's 90% envelopes. The cover is an old cardboard box, covered with an envelope a dear friend sent me stuff in. (Thank you Wendy!) I lined the spine with some super to make it stronger. 

This year I plan to do a very low pressure Inktober. No pressure at all actually. I will draw with ink every day, but it may just be a 5 minute doodle and I won't feel bad about that.

Monday, August 10, 2020

Solution for warping paper with collage

Blind contour drawing with collage. Judith Hoffman 2020
Blind contour drawing on collage. Judith Hoffman 2020


 In my last post I was worried about collaged papers warping. I got a number of suggestions from my book arts group and friends online. I think I have found a solution that is not perfect but will work for my method of collaging. Most of these are in my Flickr albums.

Here are my notes, which I intend to print and hang on the wall in my studio.

  • Try to have grain of substrate and major collage pieces in same direction.
  • Coat back and front of substrate with Gold matte medium. (not liquid matte medium). Coat one side, allow to dry, coat other side, allow to dry. 
  • Draw on tissue paper (yellow stuff I have been calling architect's tracing, but may not really be that. It's light yellow, in a roll.) - at least the blind contour can be drawn on, can also add hatching. Coat back and front of tissue paper with matte medium to increase transparency. Coat one side, allow to dry, coat other side, allow to dry.
  • Make the collage using PVA for the opaque papers.
  • Add the transparent papers using matte medium as the glue. The would be last or almost last to take advantage of the transparency and layers. While adding transparent papers paint the whole collage with matte medium.
  • Between all stages dry under stacks of books.
  • It is possible to draw on the collage with d'Atramentis inks at this stage. Adding small details and patterns.
  • If the collage is still too warped when it's done, wrap in a damp dish cloth (smooth texture like the black and white ones), wrap in waxed paper, leave under a few books for 15 minutes. Put between two pieces of blotter paper, leave at least overnight. First test was about 18 hours. Things are not perfectly flat but fine with me. Things can take days or a week to dry in blotters.

Blind contour drawing with collage. Judith Hoffman 2020
Looking Back, blind contour drawing with hatching and collage. Judith Hoffman 2020

Substrates that have worked:

  • Bockingford - has textured surface like cold press. 
  • Rising Bristol 2 ply - very slight texture.
  • Strathmore mixed media - also fairly smooth.
  • Fabriano Artistico 300 lb. 

Saturday, August 08, 2020

What to do - I love glue

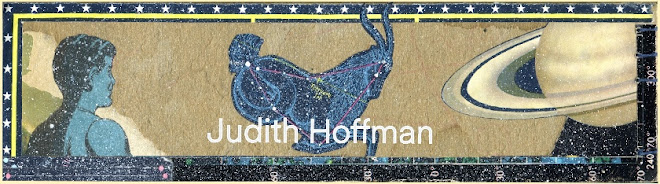
5 x 7 postcard. Blind contour, drawing, collage. Judith Hoffman

Well, it's more like "I love PVA." I have been trying to make collages on postcard size pieces of paper. The paper tends to curl. I'm using both 90 pound papers and 300 pound papers as substrates, both coated on two sides with Matte medium. Next I collage on some background papers for texture and interest, using PVA. These are not coated before collaging. My blind contour drawings go on top of the "texture" papers. They are on tracing paper because it's pretty transparent. The tracing paper shrinks a lot when glued down, so I coat it with matte medium on both sides, allow to dry, then glue it down with more matte medium. Neither substrate stays flat. Although I think things are improved by coating both sides of the papers. My process is intuitive, and I try to be fairly fast. I don't really want to plan every step, coat all the papers and then wait for them to dry before doing the collage.

5 x 7 postcard. Blind Contour drawing, collage. Judith Hoffman

There is a method, invented by Jonathan Talbot, where you coat all your papers with gloss medium and them iron them together. I have tried it, and it works perfectly. It even works with matte medium. It's almost too perfect. You have to have a plan, coat all papers, then iron everything in place. I am resisting that at the moment. I hate ironing and planning and really like the glue process. 

Transfer test, using Talbot transfer paper

I am also experimenting with transfers, thinking I could use that method instead of the drawings on tracing papers. Above is the first test - I drew on the Talbot transfer paper, ironed it to an old book page and after wetting the page, I rubbed off the transfer paper. I think this would work okay with a stronger substrate. But again it's not a fun process. If the whole collage was sealed with matte medium, I think this would work okay. The rubbing is tedious, although the Talbot paper comes off pretty easily. I wonder why I think this is supposed to be fun? I do also like the warm yellowish tones of the tracing paper. They show a little in both the postcards above.

Work table testing zone
And finally a shot of my work table. It's just a big sheet of 4 by 8 plywood on shelves so I cover it with this old yellow paper I got very cheap years ago. It's the perfect surface to test whatever I am about to draw with.